Porting an unikernel to Xen: PV guest
Welcome back once again to my blog post series on how to port an unikernel to Xen. Last week i showed you how i got HermitCore running as a fully virtualized guest in Xen. This week it is finally time to get our hands dirty and to start modifying the operating system :-) . The source code for this post can be found in the xen_parav branch of my HermitCore fork.
Table of contents
- ELF notes
- Modifying the assembly boot code
- Initializing XEN specific features
- Time keeping
- Events
- Console output
- Interrupts
- Memory Management
- Conclusion
To start HermitCore as a paravirtualized guest, changes have to be made to the boot code so it can be loaded by the generic ELF loader included in Xen. Since Xen boots paravirtualized guests directly into 64 bit mode, no changes have to be implemented in the ldhermit.elf loader binary and the compiled application binary can be started directly.
ELF notes
First, the standard Xen ELF notes have to be included, allowing the binary to be loaded by the Xen toolstack domain builder. When the guest is started, the application binary is read and the ELF PT_NOTE program header is parsed. The hypervisor looks in the .note sections of the ELF file for the “Xen” notes. The description fields are Xen specific and contain the required information to find out where the kernel expects its virtual base address, what type of hypervisor it can work with, certain features the kernel image can support and the location of the hypercall page, etc. All ELF note elements have the same basic structure:
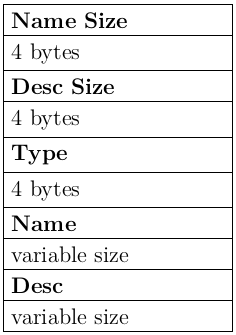
The Name Size and Desc Size fields are integers, which specify the size of the Name and Desc fields (excluding padding). The Name field specifies the vendor who defined the format of the Note. Typically, vendors use names which are related to their project and/or company names. For instance, the GNU Project uses GNU as its name. The Type field is vendor specific, but it is usually treated as an integer which identifies the type of the note. The Desc field is also vendor specific, and usually contains data which depends on the note type.
Xen defines the following types for ELF notes:
XEN_ELFNOTE_INFO
XEN_ELFNOTE_ENTRY
XEN_ELFNOTE_HYPERCALL_PAGE
XEN_ELFNOTE_VIRT_BASE
XEN_ELFNOTE_PADDR_OFFSET
XEN_ELFNOTE_XEN_VERSION
XEN_ELFNOTE_GUEST_OS
XEN_ELFNOTE_GUEST_VERSION
XEN_ELFNOTE_LOADER
XEN_ELFNOTE_PAE_MODE
XEN_ELFNOTE_FEATURES
XEN_ELFNOTE_BSD_SYMTAB
XEN_ELFNOTE_HV_START_LOW
XEN_ELFNOTE_L1_MFN_VALID
XEN_ELFNOTE_SUSPEND_CANCEL
XEN_ELFNOTE_INIT_P2M
XEN_ELFNOTE_MOD_START_PFN
XEN_ELFNOTE_SUPPORTED_FEATURES
XEN_ELFNOTE_PHYS32_ENTRY
The definitions of the different types can be found in the elfnotes.h header-file. Mini-OS implements a macro to add ELF notes in the following way.
    #define ELFNOTE(name, type, desc)           \
    .pushsection .note.name               ; \
    .align 4                              ; \
    .long 2f - 1f       /* namesz */      ; \
    .long 4f - 3f       /* descsz */      ; \
    .long type          /* type   */      ; \
1:.asciz #name          /* name   */      ; \
2:.align 4                                ; \
3:desc                  /* desc   */      ; \
4:.align 4                                ; \
    .popsection
It can be called like this:
ELFNOTE(Xen, XEN_ELFNOTE_GUEST_OS, .asciz "Mini-OS-x86_64")
ELFNOTE(Xen, XEN_ELFNOTE_LOADER, .asciz "generic")
Unfortunately, Mini-OS compiles it’s assembly files with gcc, which uses the AT&T assembly syntax. HermitCore on the other hand, uses nasm which uses the Intel assembly syntax. Since they are not compatible the ELFNOTE macro needs to be rewritten. A very helpful comparison of the two styles can be found here. Without going into detail, this is an equivalent implementation in Intel assembly syntax for HermitCore:
%macro ELFNOTE 3 ; name, type, descr
    align 4
    dd %%2 - %%1
    dd %%4 - %%3
    dd %2
  %%1:
    dd %1
  %%2:
    align 4
  %%3:
    dd %3
  %%4:
    align 4
%endmacro
Which can be called like this:
SECTION .note
elf_notes:
  ELFNOTE "Xen",XEN_ELFNOTE_GUEST_OS,"HermitCore"
  ELFNOTE "Xen",XEN_ELFNOTE_GUEST_VERSION,"0.2.5"
  ELFNOTE "Xen",XEN_ELFNOTE_LOADER,"generic"
  ELFNOTE "Xen",XEN_ELFNOTE_XEN_VERSION,"xen-3.0"
  ELFNOTE "Xen",XEN_ELFNOTE_HYPERCALL_PAGE,hypercall_page
  ELFNOTE "Xen",XEN_ELFNOTE_ENTRY,_start
  ELFNOTE "Xen",XEN_ELFNOTE_FEATURES,0x3
With these notes added to the kernels entry.asm file, the Xen domain builder is able to detect the binary and tries to boot it. At this point the domain still dies almost instantly, so additional changes to the assembly boot code have to be made.
Modifying the assembly boot code
The initial boot time environment of a Xen PV guest is different from the normal initial mode of an x86 processor. Instead of starting with paging disabled in 16-bit mode, a PV guest is started in either 32 or 64 bit mode with paging enabled and runs on a first set of page tables provided by the hypervisor. These pages are set up to correspond to the required invariants and are loaded into the base register of the page table, but are not explicitly pinned.
The initial virtual and pseudo physical memory layout is described in the xen.h header file.
1. The domain is started within contiguous virtual-memory region
2. The contiguous region ends on an aligned 4MB boundary.
3. This the order of bootstrap elements in the initial
virtual region:
a. relocated kernel image
b. initial ram disk [mod_start, mod_len]
(may be omitted)
c. list of allocated page frames [mfn_list, nr_pages]
(unless relocated due to XEN_ELFNOTE_INIT_P2M)
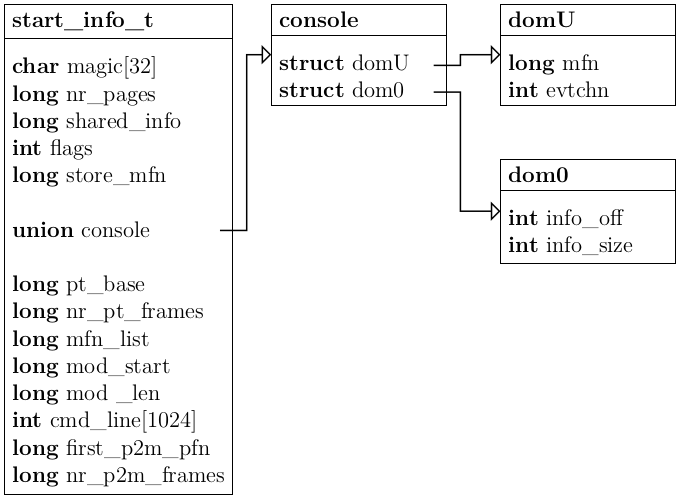
d. start_info_t structure [register rSI (x86)]
in case of dom0 this page contains the console info, too
e. unless dom0: xenstore ring page
f. unless dom0: console ring page
g. bootstrap page tables [pt_base and CR3 (x86)]
h. bootstrap stack [register ESP (x86)]
4. Bootstrap elements are packed together, but each is
4kB-aligned.
5. The list of page frames forms a contiguous 'pseudo-physical'
memory layout for the domain. In particular, the bootstrap
virtual-memory region is a 1:1 mapping to the first section
of the pseudo-physical map.
6. All bootstrap elements are mapped read-writable for the guest
OS. The only exception is the bootstrap page table,
which is mapped read-only.
7. There is guaranteed to be at least 512kB padding after the
final bootstrap element. If necessary, the bootstrap
virtual region is extended by an extra 4MB to ensure this.
To jump from the assembly boot code to the actual kernel C code, there are only a few things needed. When the guest is launched as explained above, the ESI or RSI register (depending on wether it is a 32 or 64 bit guest) contains a start_info_t structure which is needed later on and needs to be saved. Other than that, only a stack has to be set up. This simplifies the boot code a lot to the just few following lines:
SECTION .mboot
global _start
_start:
jmp start64

...

SECTION .ktext
align 4
start64:
cld                                 ; clear registers
add rsp, KERNEL_STACK_SIZE-16       ; set up stack
mov rdi, rsi                        ; pass start_info_t as
extern hermit_main                  ; argument to hermit_main
call hermit_main                    ; jump into C-code
jmp $
After the above code ran, the instruction pointer is pointing at the hermit_main function defined in the kernels main.c file.
Initializing XEN specific features
The next things the guest has to set up are some XEN specific features. Upon starting, a PV guest gets passed a start_info_t structure which contains many important information for the operating system.
Particularly important are the nr_pages, shared_info and domU entries. They are needed for determining the assigned RAM, communication with the Xen hypervisor and console output. The assembly boot code passes the virtual address of the structure to the hermit_main function as the first argument.
Hypercalls
The environment presented to a Xen PV guest is not quite the same as that of a real x86 system. From the perspective of the operating system, the biggest difference is that it is running in ring 1 or ring 3 instead of ring 0. This means that it cannot perform any privileged instructions. In order to provide similar functionality, the hypervisor exposes a set of hypercalls that correspond to the instructions. A hypercall is conceptually similar to a system call. To request a service from the hypervisor, the guest calls a function in a shared memory page which gets mapped by the hypervisor.
First, a special page must be created in the assembly boot code.
global shared_info, hypercall_page
ALIGN 4096
shared_info:
    times 512 DQ 0

hypercall_page:
    times 512 DQ 0
Then the virtual address of the hypercall_page gets passed to the hypervisor in an ELF note
ELFNOTE "Xen",XEN_ELFNOTE_HYPERCALL_PAGE,hypercall_page
Hypercalls are issued by calling an address within this page. The following listing shows a macro that is used to call a hypercall without additional arguments.
extern char hypercall_page[4096];
#define _hypercall0(type, name)			                 \
({						                                 \
long __res;				                                 \
asm volatile (				                             \
"call hypercall_page + ("STR(__HYPERVISOR_##name)" * 32)"\
: "=a" (__res)			                                 \
:				                                         \
: "memory" );			                                 \
(type)__res;				                             \
})
A list of all hypercalls the guest can use, can also be found in the xen.h header file. Upon usage, the individual hypercalls will be explained in more detail.
Shared Info page
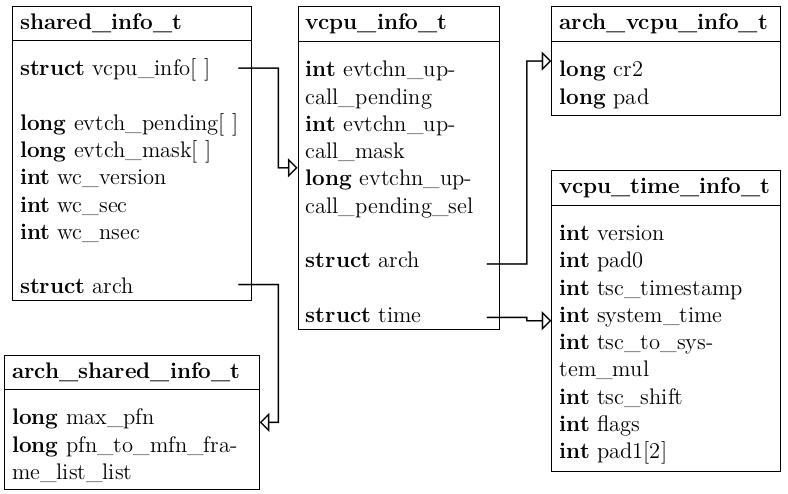
One of the first things a guest has to do is to set up the shared_info page. It contains a shared_info_t struct which holds valuable information about the virtual CPUs assigned to the guest, the system time and event channels which can be used to communicate with other domains. It is again defined in the xen.h header file. The machine address of the shared_info page is defined in the start_info_t struct. In order to map it into the virtual address space, the guest has to issue the HYPERVISOR_update_va_mapping hypercall.
HYPERVISOR_update_va_mapping(
    (unsigned long) &shared_info,            // defined in entry.asm
    (unsigned long) start_info->shared_info, // passed by Xen
    UVMF_INVLPG)                             // invalidate TLB entry
);
After this is completed, the guest is able to use a pointer to the shared_info page as it would any other data structure.
shared_info_t *HYPERVISOR_shared_info = (shared_info_t*) &shared_info;
Time keeping
The default way of HermitCore to determine system time, is to simply get the elapsed clock ticks since boot time. This is done by receiving interrupts from the PIT or APIC timer and counting them.
 /** @brief Get milliseconds since system boot */
static inline uint64_t get_uptime()
{
    return (get_clock_tick() * 1000) / TIMER_FREQ;
}

/** @brief Returns the current number of ticks. */
static inline uint64_t get_clock_tick(void)
{
    return per_core(timer_ticks);
}

 /* Handles the timer. In this case, it's very simple: We
  * increment the 'timer_ticks' variable every time the
  * timer fires. */
static void timer_handler(struct state *s)
{
	/* Increment our 'tick counter' */
	set_per_core(timer_ticks, per_core(timer_ticks)+1);
}
The number of tics is divided by the timer frequency and multiplied by 1000 to get the elapsed milliseconds.
When running as a PV guest in Xen, the operating system does not have access to a PIT or APIC timer and thus the default time keeping method will not work. Xen provides the guest with all the information necessary to keep track of time through the shared_info_t struct.
In general, there are two types of time that a Xen guest must keep in mind. The first is the wall clock time - the elapsed real time. It is used for userspace applications that perform scheduled tasks, display clocks, and so on. The second is virtual time - the time the guest has spent executing. Virtual time is essential for scheduling tasks that are performed within a domain.
While a guest is scheduled, he receives a periodic tic event every 10 ms. This allows him to easily keep an eye on the virtual time. Real-time values are somewhat more complicated. Three different time values are needed to track real time:
-
Initial system time
is the time of day when system time is zero. -
Current system time
is the time that has elapsed since the guest was resumed and is updated whenever the guest is scheduled. -
TSC time
is the number of cycles that have elapsed since an arbitrary point in the past.
To calculate the uptime, i implemented a gettimeofday() function using the provided information.
gettimeofday()
Implementing the gettimeofday() function requires access to the shared_info page, the TSC and some simple calculations. The shared_info_t struct contains time values which are regularly updated by Xen.
To calculate the time, the guest has to wait until the last bits of the wc_version and version variables equal zero. This indicates the time values are not being updated and are save to read. Then, the current system time can be calculated with the following formula:
current system time = system_time + ((((tsc - tsc_timestamp) << tsc_shift) * tsc_to_system_mul) >> 32)
To get the wall clock time, the calculated system time has to be added to the wc_sec and wc_nsec values.
nanoseconds = wc_nsec + current system time
seconds = wc_sec + (nanoseconds ÷ 1.000.000.000)
nanoseconds = nanoseconds mod 1.000.000.000
seconds now contains the elapsed seconds since the Epoch. A complete implementation of the gettimeofday() function can be found in the file time.c.
Events
Event channels are the basic element that Xen provides for event notifications. An event is the Xen equivalent of a hardware interrupt. They essentially store one bit of information, the event of interest is signalled by switching that bit from 0 to 1. Notifications are received from a guest via an upcall from Xen that indicates when an event occurs (by setting the bit). Further notifications are masked until the bit is deleted again. Therefore guests must check the value of the bit after re-enabling the delivery of events to ensure that no missed notifications are received. Event notifications can be masked by setting a flag. This is equivalent to disabling interrupts and can be used to ensure the atomicity of certain operations in the guest kernel.
All event notifications are received by the same handler. The guest has to set up a way to dispatch events to their correct handlers when they are received. Since events are delivered completely asynchronously (much like normal hardware interrupts) they can occur at any point in execution. Upon entering the event handler it is therefore necessary for the guest to save the current state. When exiting an interrupt handler on x86, it is common to use the IRET instruction. This restores control to the interrupted process an re-enables interrupts atomically. Since events are an entirely software construct, the IRET instruction has no way of knowing how to enable them . There are two solutions for this. Xen provides an IRET hypercall that re-enables event delivery via the hypervisor. The other way it to not re-enable them atomically and handle errors when something goes wrong.
The actual implementation of the event handling has been taken in large parts from the examples provied in David Chisnall’s book “The Definitive Guide to the Xen Hypervisor”. It is rather complex and involves a lot of jumping from assembly code to C code and back. Explaining it in detail would go beyond the scope of this chapter. The code can be found in the entry.asm and event.c files. For further information an on how this works exactly, i would advise you to read chapter 7 in the mentioned book.
Console output
Xen provides the user with the possibility to connect a virtual console to a running guest. This enables the user to read the boot output of the guest and interact with it in the terminal in a way that is very similar to connecting to another computer via ssh. The console can either be attached when starting the guest by adding the “-c” flag
xl create -c domain_config
or later on by issuing the following command:
xl console <Domain>
Inside the guest, the console is also implemented using a shared memory page. The start_info_t struct shown in Figure 3.2 contains the machine page number of the console page and the event channel that is used for communication. To initialize the console, the guest first has to translate the machine page number of the console page into a physical page number. To avoid confusion, it is helpful to clarify the different types of memory addresses:
-
machine address
address in the (real) machine’s address space running Xen -
physical address
address in the (virtual) guest machine’s address space -
virtual address
virtual address inside the guest
Translating a machine page number into a physical page number is done with the help of the machine_to_phys_mapping macro defined in the xen-x86_64.h header file.
#define machine_to_phys_mapping ((unsigned long *)HYPERVISOR_VIRT_START)
#define HYPERVISOR_VIRT_START xen_mk_ulong(__HYPERVISOR_VIRT_START)
#define __HYPERVISOR_VIRT_START 0xFFFF800000000000
The shared console page contains a xencons_interface struct which is defined in the console.h header file.
struct xencons_interface {
    char in[1024];
    char out[2048];
    XENCONS_RING_IDX in_cons, in_prod;
    XENCONS_RING_IDX out_cons, out_prod;
};
It consists of two ring buffers, one for input and one for output. To write output to the console, the guest essentially only has to write data into the output ring buffer. The control domain (dom0) then reads the content of the buffer and outputs it into the terminal. The complete code for Initializing the console is show in the listing below:
int console_init(start_info_t * start)
{
    console = (struct xencons_interface*)
        ((machine_to_phys_mapping[start->console.domU.mfn] << 12));
    console_evt = start->console.domU.evtchn;
    return 0;
}
Writing a string to the console works in the following way:
int console_write(char * message)
{
    struct evtchn_send event;
    event.port = console_evt;
    int length = 0;
    while(*message != '\0')
    {
        /* Wait for the back end to clear enough space in the buffer */
        XENCONS_RING_IDX data;
        do
        {
            data = console->out_prod - console->out_cons;
            HYPERVISOR_event_channel_op(EVTCHNOP_send, &event);
            mb();
        } while (data >= sizeof(console->out));
        /* Copy the byte */
        int ring_index = MASK_XENCONS_IDX(console->out_prod, console->out);
        console->out[ring_index] = *message;
        /* Ensure that the data really is in the ring before continuing */
        wmb();
        /* Increment input and output pointers */
        console->out_prod++;
        length++;
        message++;
    }
    HYPERVISOR_event_channel_op(EVTCHNOP_send, &event);
    return length;
}
Once the guest has written data into the output buffer, it sends an event channel notification to the dom0 with the help of the HYPERVISOR_event_channel_op hypercall. For a more convenient usage, i also implemented a printf-like function. The complete implementation can be found in the console.c file.
Interrupts
In addition to events, Xen provides a lower-level form of asynchronous notification in the form of traps. Unlike events that can be dynamically generated and bound, traps have a static meaning that corresponds directly to hardware interrupts. When the guest is started on a physical CPU, Xen installs an Interrupt Descriptor Table (IDT) in the guests name. Since traps correspond directly to hardware interrupts, the same code can be used to handle them.
To install an IDT, the guest has to use the HYPERVISOR_set_trap_table hypercall. It accepts an array of trap_info_t structs which contains one entry for every interrupt.
struct trap_info {
    uint8_t       vector;  /* exception vector      */
    uint8_t       flags;   /* 0-3: privilege level  */
    uint16_t      cs;      /* code selector         */
    unsigned long address; /* code offset           */
};
typedef struct trap_info trap_info_t;
Each entry contains the number of the interrupt, the highest privilege ring that can raise the interrupt and the address of the handler. All of HermitCores functions relating to creating the IDT have been rewritten to fill out such an array.
/* We have defined exactly 66 interrupts */
static trap_info_t idt[67] = {[0 ... 66] = {0, 0, 0, 0}};
uint8_t trap_counter = 0;

static void configure_idt_entry(trap_info_t *dest_entry,uint8_t num, size_t base,t16_t sel, uint8_t flags)
{
    /* The interrupt routine's base address */
    dest_entry->address = base;
    dest_entry->vector = num;
    /* The segment or 'selector' that this IDT entry will use
     *  is set here, along with any access flags */
    dest_entry->cs = sel;
    dest_entry->flags = flags;
}

void idt_set_gate(uint8_t num, size_t base, uint16_t sel, uint8_t flags)
{
    configure_idt_entry(&idt[trap_counter++], num, base, sel, flags);
}
To configure an IDT entry, the idt_set_gate function can be called like this:
idt_set_gate(0, (size_t)isr0, FLAT_KERNEL_CS, 0);
FLAT_KERNEL_CS is a flag defined by Xen. It represents the code segment created by Xen mirroring a flat address space, where the entire space is mapped into a single segment.
When HermitCore has finished filling out the IDT entries, it calls the idt_install function.
void idt_install(void)
{
    /* Issue a hypercall to install the new idt */
    int ret = HYPERVISOR_set_trap_table(idt);
    if (ret) {
        LOG_INFO("Failed to set Trap Table!\n");
        LOG_INFO("Error: %d\n", ret);
        asm volatile ("hlt");
    }
    LOG_INFO("Installed new IDT with %d entries.\n", trap_counter);
}
This issues the HYPERVISOR_set_trap_table hypercall, which instructs Xen to install the new IDT on behalf of the guest after it has been validated.
Memory Management
One of the original innovations of the Xen hypervisor was the paravirtualized Memory Management Unit (MMU), which enabled fast and efficient virtualization of guests using paging. To virtualize the memory subsystem, all hypervisors require an additional level of abstraction between what a guest sees as physical memory and the memory of the machine running the hypervisor. This is usually done via Physical to Machine (P2M) mapping and is managed by the hypervisor, i.e. it is hidden from the guest’s operating system. Instead, the Xen MMU model requires the guest to know of the P2M mapping. The guest’s operating system must be modified so that instead of writing page table updates to the physical address, they must be written to the machine address. To ensure that the guest cannot access memory areas he should not have access to, Xen requires that all page table updates be performed by the hypervisor. This means that the guest has read access to all page tables and must issue hypercalls when updating.
Modifying HermitCore’s memory management to work with the invariants of Xen would require to rewrite large parts of it. Considering that developing the memory management code has been a bachelor thesis on it’s own, implementing these changes would definitively go beyond the scope of my thesis. Instead, i modified HermitCore to run as a PVH guest on Xen.
Conclusion
Modifying HermitCore to work as a purely paravirtualized guest on Xen took a lot of changes. The lack of access to emulated hardware components such an an PIT or APIC and the specific constraints made by Xen make it necessary to rewrite many basic operating system functionalities. Considering that this would include modifying large parts of the memory management code, i changed the focus of the implementation. Instead of running HermitCore as a purely paravirtualized guest, i implemented the necessary changes to make it work as a PVH guest.
You will see in my next post, that the ability of a PVH guest to manage and modify it’s own page tables makes things a lot easier. Instead of rewriting large parts of the memory management code, i could just use the existing one without modifications. I hope you will be back for the next part,
Jan
Further reading
© 2024 JanMa's Blog ― Powered by Jekyll and hosted on GitLab