Orchestrating containers with Nomad and systemd-nspawn
In my last post I
took a deeper look into systemd-nspawn and how to use it to run containers.
Afterwards I decided to figure out the logical next step of how to orchestrate
those containers. This is what this post is all about :-). I will show you how to
use HashiCorp Nomad together with a custom plugin I
wrote for it to orchestrate systemd-nspawn containers across multiple hosts.
About Nomad
If you have never heard of Nomad or have never used it before, I can recommend you to read the Introduction to Nomad guide. To quote the docs:
Nomad is a flexible workload orchestrator that enables an organization to easily deploy and manage any containerized or legacy application using a single, unified workflow. Nomad can run a diverse workload of Docker, non-containerized, microservice, and batch applications.
In version 0.9 Nomad introduced a plugin framework which allows you to extend
it’s functionality to add new Task Drivers and Device plugins. Adding a new Task
Driver allows you to execute workloads which are not manageable by the included
ones like Docker or Java. You can find a list of already community supported
Task Drivers in the Nomad
Docs. Those include for
example:
- LXC
- Podman
- Firecracker
In the last few months I got acquainted with the new plugin framework and
wrote a custom Task Driver for systemd-nspawn. I recently released version
0.1.0 and it is now in a state where I feel it is ready to be shared with the
world :-). You can find the code at
GitHub.
For the rest of this post, I am going to assume that you have read the guide I
linked above or are otherwise already acquainted with Nomad and it’s
terminology. Also you should have Nomad installed somewhere in your PATH.
Using the nspawn plugin
To build the Task Driver for systemd-nspawn, you need a recent version of Go
installed. Checkout the repository from GitHub then then simply run go build.
git clone https://github.com/JanMa/nomad-driver-nspawn.git
cd nomad-driver-nspawn
go build -mod=vendor
This will produce a binary called nomad-driver-nspawn which can be used as a
plugin by Nomad. The easiest way to test it, is to use Nomad in development
mode. This starts a single node Nomad cluster on your machine, with the local
agent acting as client and server. From the git root run
sudo nomad agent -dev -plugin-dir=$(pwd) -config=example/config.hcl
and visit http://127.0.0.1:4646 to see the Nomad web UI. If you click
on the Clients tab, you should see your local machine and the nspawn driver
showing up as healthy in the client details.
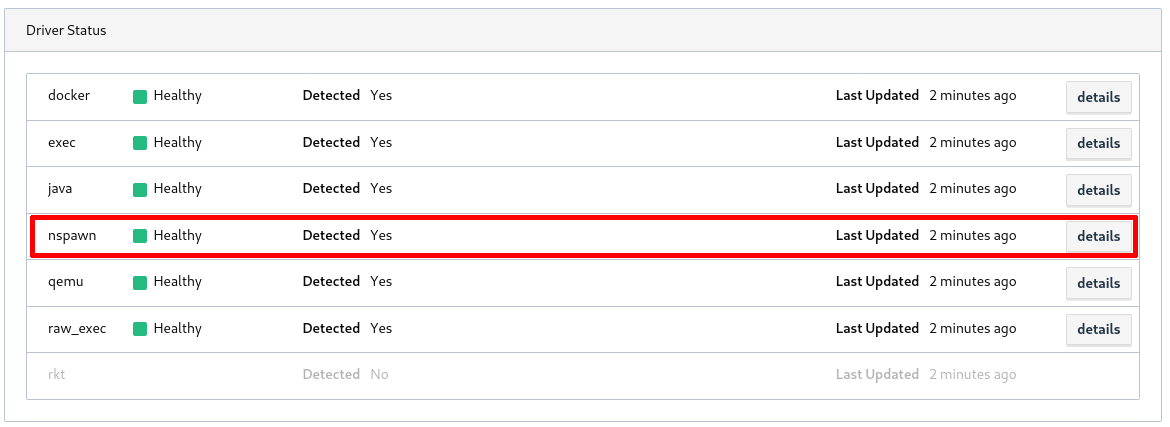
This means you are ready to start your first task.
Two simple example jobs
The driver repo contains two examples which show very basic configurations. The
first one is located in the example/Debian folder. There you will find a very
simple debian.hcl file which will start a plain Debian/Buster image that
does exactly nothing (except running systemd).
job "debian" {
  datacenters = ["dc1"]
  type = "service"
  group "linux" {
    count = 1
    task "debian" {
      driver = "nspawn"
      config {
        image = "example/Debian/image"
        resolv_conf = "copy-host"
      }
    }
  }
}
It uses the image located in the example/Debian/image folder inside the git
repo and copies the /etc/resolv.conf file of your host into the container to
enable DNS resolution.
Before you are able to run the job file, you need to build the container image
first. If you haven’t already, install
mkosi on your machine, open another shell
and run the following command inside the example/Debian folder.
sudo mkosi
Mkosi will parse the mkosi.* files in the folder and produce an image sub-folder
containing a Debian/Buster file tree. Now you can start the Task by executing:
nomad run debian.hcl
If you take a look at the output of nomad status, you should see a debian job with
the status running. The container should also show up if you call machinectl
list.
$ nomad status
ID      Type     Priority  Status   Submit Date
debian  service  50        running  2020-03-08T09:27:20+01:00
$ machinectl list
MACHINE                                     CLASS     SERVICE        OS     VERSION ADDRESSES
debian-8eeb9876-1195-413c-4433-55dcd779f586 container systemd-nspawn debian 10      192.168.60.38…

1 machines listed.
After the job has started you can attach a shell to the container or run any
command you want in it. Have a look at the output of nomad status debian and
copy the allocation ID from the last line of output. Then run
nomad alloc exec <alloc ID> /bin/bash
to start a shell inside the container. You could also do the same thing by
running machinectl shell <machine-name>. Note that this only works if the
container was started with the boot option set to true (which it is by
default).
Since this example is somewhat useless, let’s move on to the next one. In the
example/Nginx folder you will find a nginx.hcl file which is a little more
useful than the previous one.
job "nginx" {
  datacenters = ["dc1"]
  type = "service"
  group "linux" {
    count = 1
    task "nginx" {
      driver = "nspawn"
      config {
        image = "example/Nginx/image"
        resolv_conf = "copy-host"
        command = [
          "/bin/bash",
          "-c",
          "dhclient && nginx && tail -f /var/log/nginx/access.log"
          ]
        boot = false
        process_two = true
        port_map {
          http = 80
        }
      }
      resources {
        network {
          port "http" {
            static = "8080"
          }
        }
      }
    }
  }
}
The job file uses the image located in example/Nginx/image and copies the
/etc/resolv.conf as before. It also sets boot to false and in turn
process_two to true, which causes the Bash script configured in the
command stanza to be run as process two inside the container. The container’s
port 80 will be forwarded to port 8080 on your host.
To start the job, build the image the same way as before by executing sudo
mkosi and then run:
nomad run nginx.hcl
When calling nomad status, you will now see an additional nginx job running.
You will also see another machine in the output of machinectl list. If you’d
try to start a shell inside the container now, Nomad will exit with an error
since this container was not started with the boot parameter set to true.
Because the job exposes port 80 of the container to your hosts’ port 8080
you can curl it to see if Nginx is actually running. One thing to note here is
that systemd-nspawn does not forward exposed ports to your loopback interface.
So accessing 127.0.0.1:8080 will not work.
curl http://<your-ip>:8080 > /dev/null
  % Total    % Received % Xferd  Average Speed   Time    Time     Time  Current
                                 Dload  Upload   Total   Spent    Left  Speed
100   612  100   612    0     0   149k      0 --:--:-- --:--:-- --:--:--  199k
Since the last command in the containers Bash script is following the Nginx log file inside the container, you are able to see it when accessing the containers logs via Nomad.
nomad alloc logs <alloc ID>
192.168.1.226 - - [04/Mar/2020:22:13:48 +0100] "GET / HTTP/1.1" 200 612 "-" "curl/7.68.0"
192.168.1.226 - - [06/Mar/2020:21:41:56 +0100] "GET / HTTP/1.1" 200 612 "-" "curl/7.68.0"
Those examples are of course very simple and not suited for any real world
workloads. Make sure to have a look at the drivers
README
page for all options it currently supports. The naming is kept close to the
names of the underlying systemd-nspawn arguments.
Conclusion
In it’s current state the driver should allow you to run reasonably complex
workloads with it, but it is by no means finished. For example I am trying to
figure out a way to allow executing commands via nomad alloc exec in containers
which are not started with the boot parameter. I also want to add support for
network modes which allow you to start multiple containers in the same isolated
network namespace.
Also there’s the problem of image distribution which needs to be solved somehow.
Manually building container images on your hosts before being able to start
tasks on them isn’t really convenient. You can currently circumvent it a bit by
using the artifact
stanza in your job file to download an image from some server before starting a
task though. Make sure to have a look at nspawn.org for
some nice pre-built container images you could use.
If you find issues or a bug in the driver or have general questions about it, please open an Issue at GitHub and I will try to help you as good as I can :-)
Jan
© 2024 JanMa's Blog ― Powered by Jekyll and hosted on GitLab